News
White balance
02 June 2020
Article by James Zjalic (Verden Forensics) and Foclar
Problem
Whilst resolving the problems of a skewed pixel intensity histogram (as covered in the previous article) can dramatically improve the visibility of features, it does not address factors relating to the accuracy of tones captured within digital imagery. Although CCTV systems implement a system for white balance, the results can be poor as they operate under variable lighting conditions [1]. The result is a general hue to the colour space.
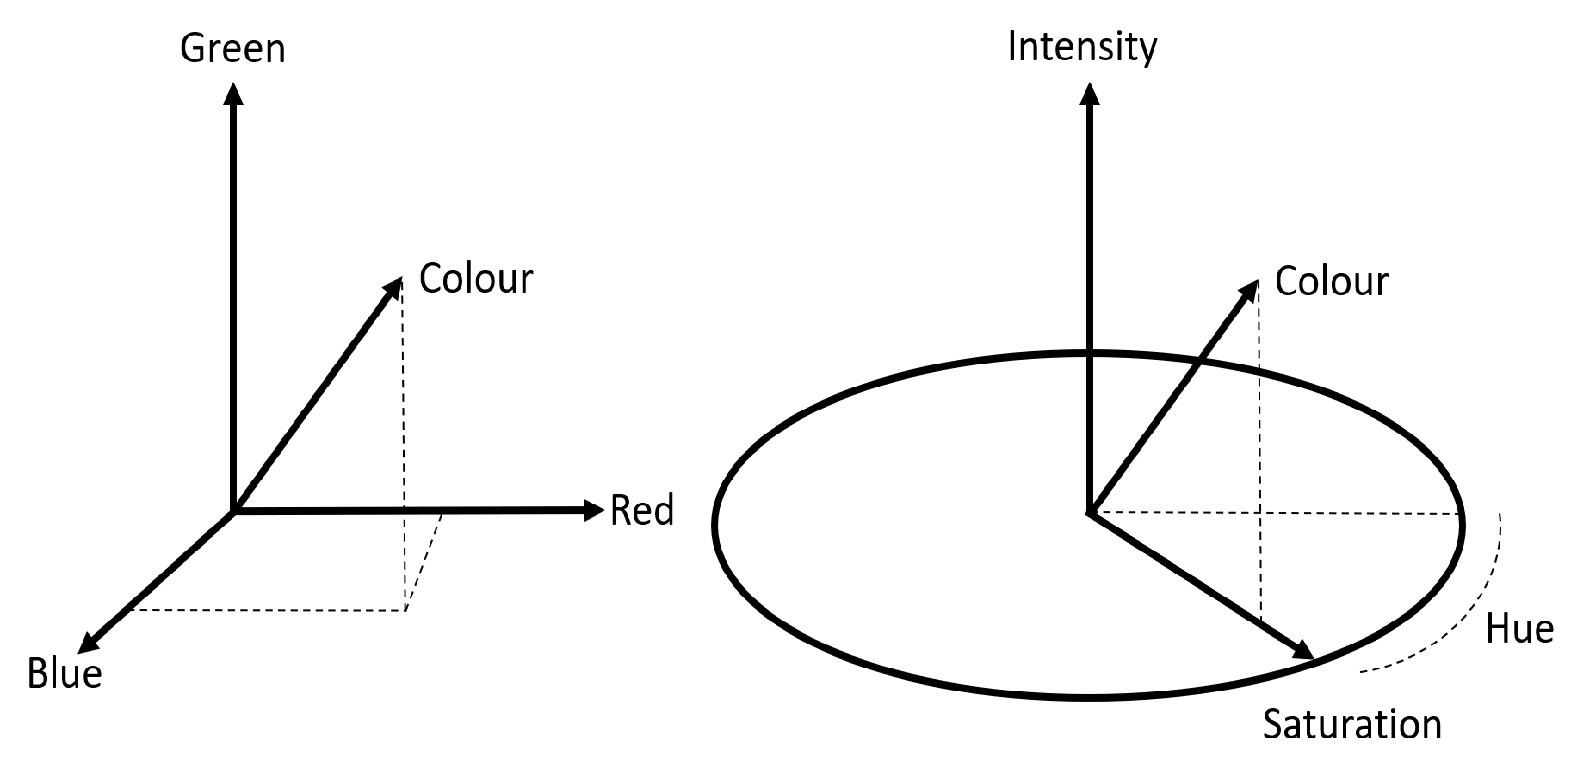
Although hue is often thought as the addition of a tint to colours, it is also used for the mathematical description of a colour used within colour spaces. One of the most well-known colour spaces is RGB (Fig. 1, left), where colour is characterised by three coordinates R (red) G (green) and B (blue). Any colour can be decomposed into a combination of these three elements. Alternatively, colour can also be characterised by three coordinates H (hue), S (saturation) and I (intensity) in the HSI colour space (Fig. 1, right, Fig. 2).
When imagery is not intended for forensic purposes, this is generally not an issue as the human vision system can adapt to variations in the white reference within a degree of tolerance. The human vision system essentially creates its own white reference when imagery is viewed in isolation, for example, when watching a film within a dark room. Human vision also adapts the white reference when in artificial light, which is never ‘true white’, but a shade of yellow. If imagery which contains a hue is viewed side by side with a white reference, the degree of offset from true white becomes evident.
As it relates to forensics, any hue to the imagery has the potential to result in misinterpretation of tones which may be crucial when utilised in photographic imagery comparison cases. Take, for example, an item of clothing which is represented within CCTV imagery with a blue hue. If no consideration is made for the impact of the incorrect white balance, the shirt may be considered to be of a mid-tone rather than light. When a similar item of clothing is recovered from a suspect’s home, this could potentially result in an opinion being rendered that they are dissimilar based on the differing tone by laypersons with little understanding of imagery concepts.
Cause
The core reason for a digital image with a hue is a colour temperature shift within the environment, causing a shift in the reflection of light from its true colour. For example, when the colour white is illuminated with a low colour temperature source, it gains a red tint. When illuminated by a high colour temperature source, it gains a blue tint. This transposes to a relative imbalance between the pixel intensity values of the RGB layers once captured as digital imagery, and the degree of red tint is dictated by the ratio between the red and green layers, whilst the degree of blue tint is controlled by the ratio between the blue and green layers [2]. The most common reasons for such are a light source which emits different coloured light across a scene (such as found within nightclub environments) or captures during sunset and sunrise.
Theory
For an object to be illuminated, it must reflect light, demonstrated by the fact that the human vision system cannot perceive anything in a dark room, and CCTV cameras capture little to no information if the scene which it is focused contains no light source. The colour of an object is dictated by the colours which it does not absorb (and thus reflects). As natural light contains all the colours of the spectrum (as can be witnessed when split by a rainbow or a prism), the result is white light, or in digital terms RGB layers each with a pixel intensity value of 255. When perfect white light hits an object such as a white shirt (which does not absorb any of the spectra), the result is that all wavelengths of the spectrum are reflected, and thus we see the shirt as white. If we now consider a red hue, when the light hits the shirt in the previous example, all of the spectra is reflected, and thus we see the shirt as red. Other colours will be represented differently based on the wavelengths that they reflect.
As there are a number of variables within the real-world environment pertaining to a light source, there is no unique definition of white. It is instead considered to be a set of tristimulus values reproduced by equal contributions of power amongst the primary colours. The physical composition of light is expressed using the Spectral Power Distribution (SPD). The SPD pertaining to the visible range of 400nm – 700nm wavelengths is split into three components (RGB) when captured by a digital system using spectral weighting functions, thus allowing digital imagery to essentially reproduce the SPD of the capture environment scene. These functions were proposed by CIE [3] in 1931 as a standardised set of weighting functions to represent colour seen by humans by measuring the mixture of spectral distributions of such [4].
Solution
To correct the relative intensity values between the layers, a reference point of known colour is needed, thus allowing other pixel intensity values to be shifted by a degree relative to such. As colours within imagery can be represented slightly differently depending on factors such as the lens, sensor and compression used, and the majority of the time we do not know the ‘true’ colour of an object within imagery, colours are not suitable candidates. As black absorbs all colours, it is not possible to find the relative offset as in ideal conditions it will always be represented as R: 0, G: 0, B: 0. We know that white, on the other hand, reflects all wavelengths, and thus any relative imbalance in such will be transposed to the RGB values. There are also a number of objects in the real world that are standardised as white, such as road markings, number plates and light switches. Hence, white is the perfect candidate, and so it is this which we take a sample as for reference. White balance is therefore used to make adjustments, so all colours appear as though captured within ideal white light [5].
Implementations
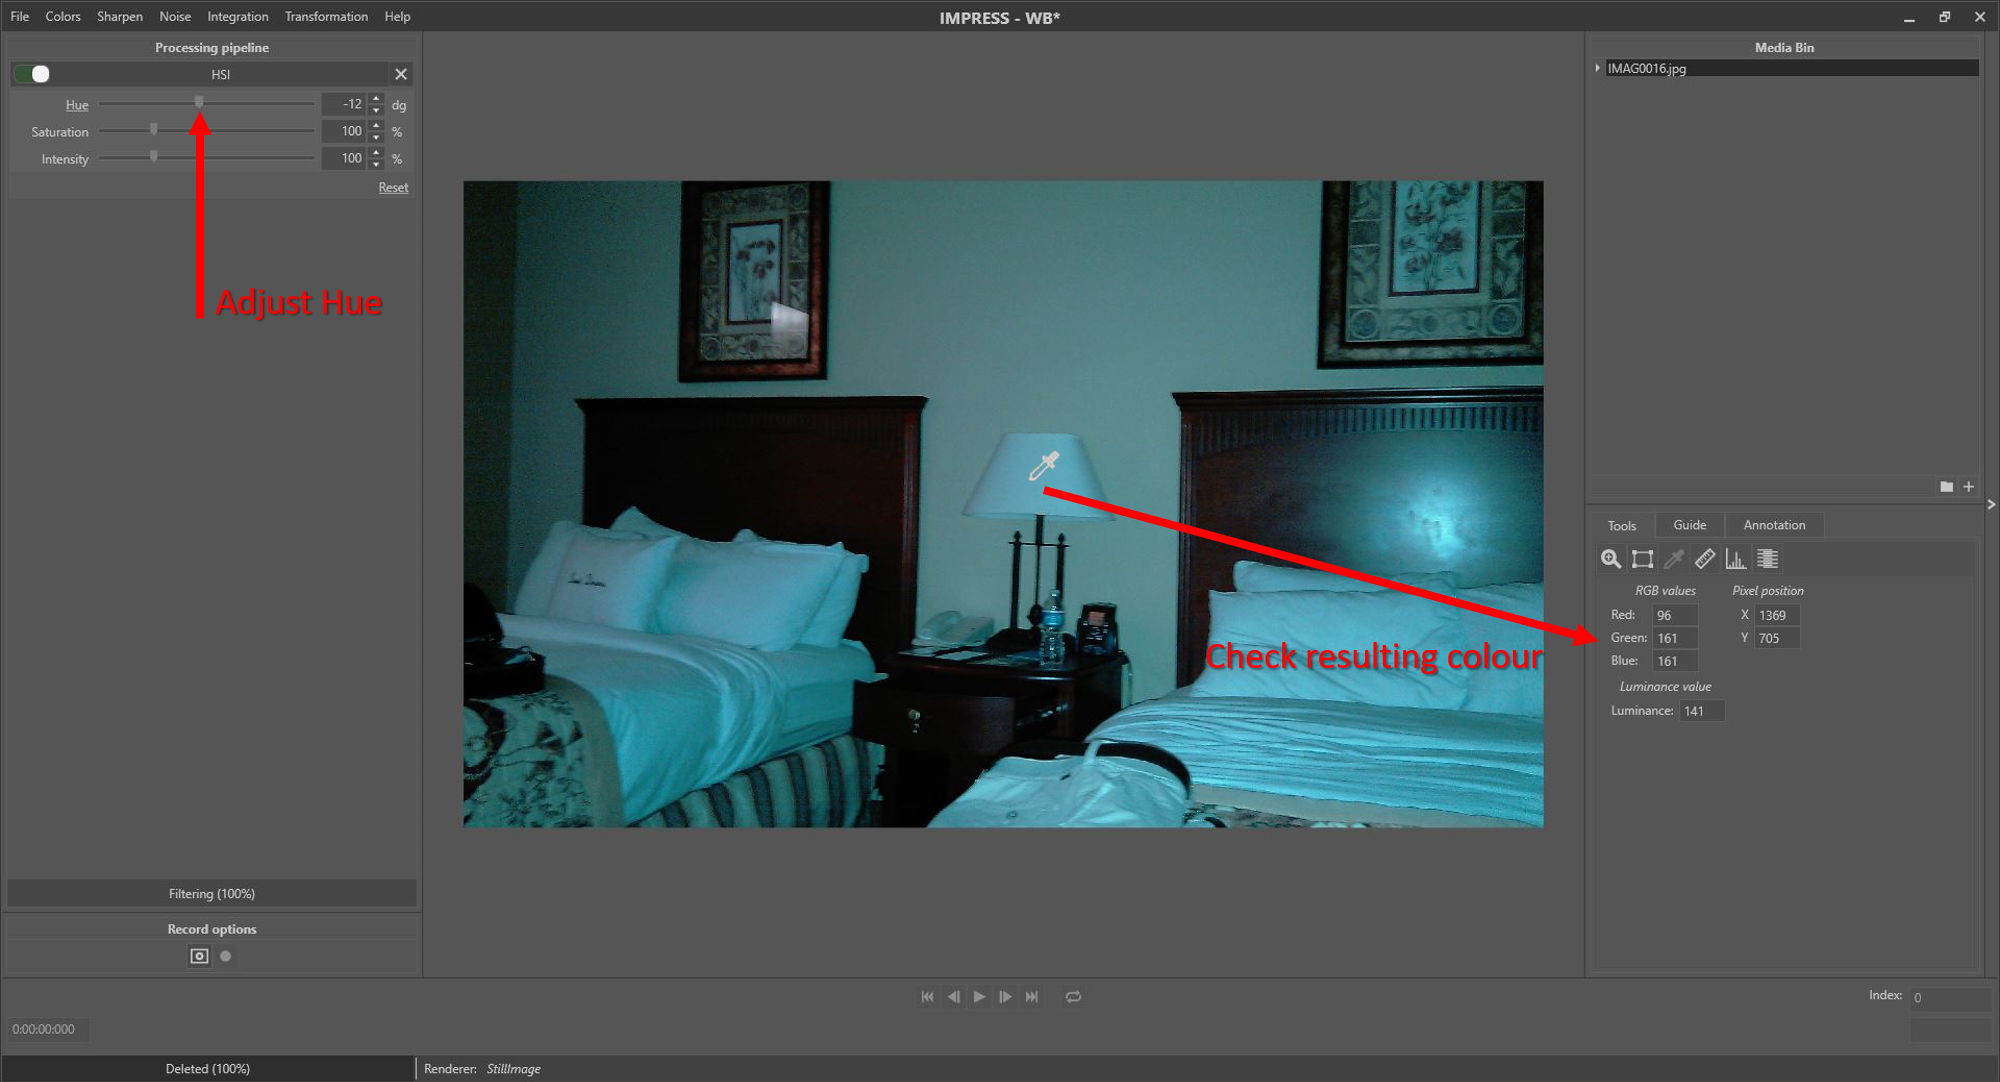
Foclar Impress provides the possibility to correct for hue by applying a HSI colour space conversion filter [6]. The colour picker tool can be used to verify if the current parameter setting results in the correct output colours (Fig. 3).
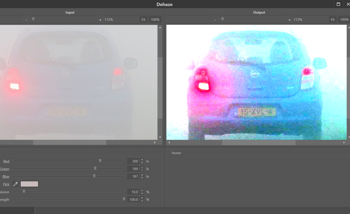
Alternatively, one can try to accomplish the right lighting correction with the white balance filter [7]. If a certain image location (pixel or object) is expected to be white in perfect lighting conditions, the colour in the image might still deviate from white. By selecting the expected white pixel (Fig. 4), all colours in the image can be adjusted according to the measured colour offset.
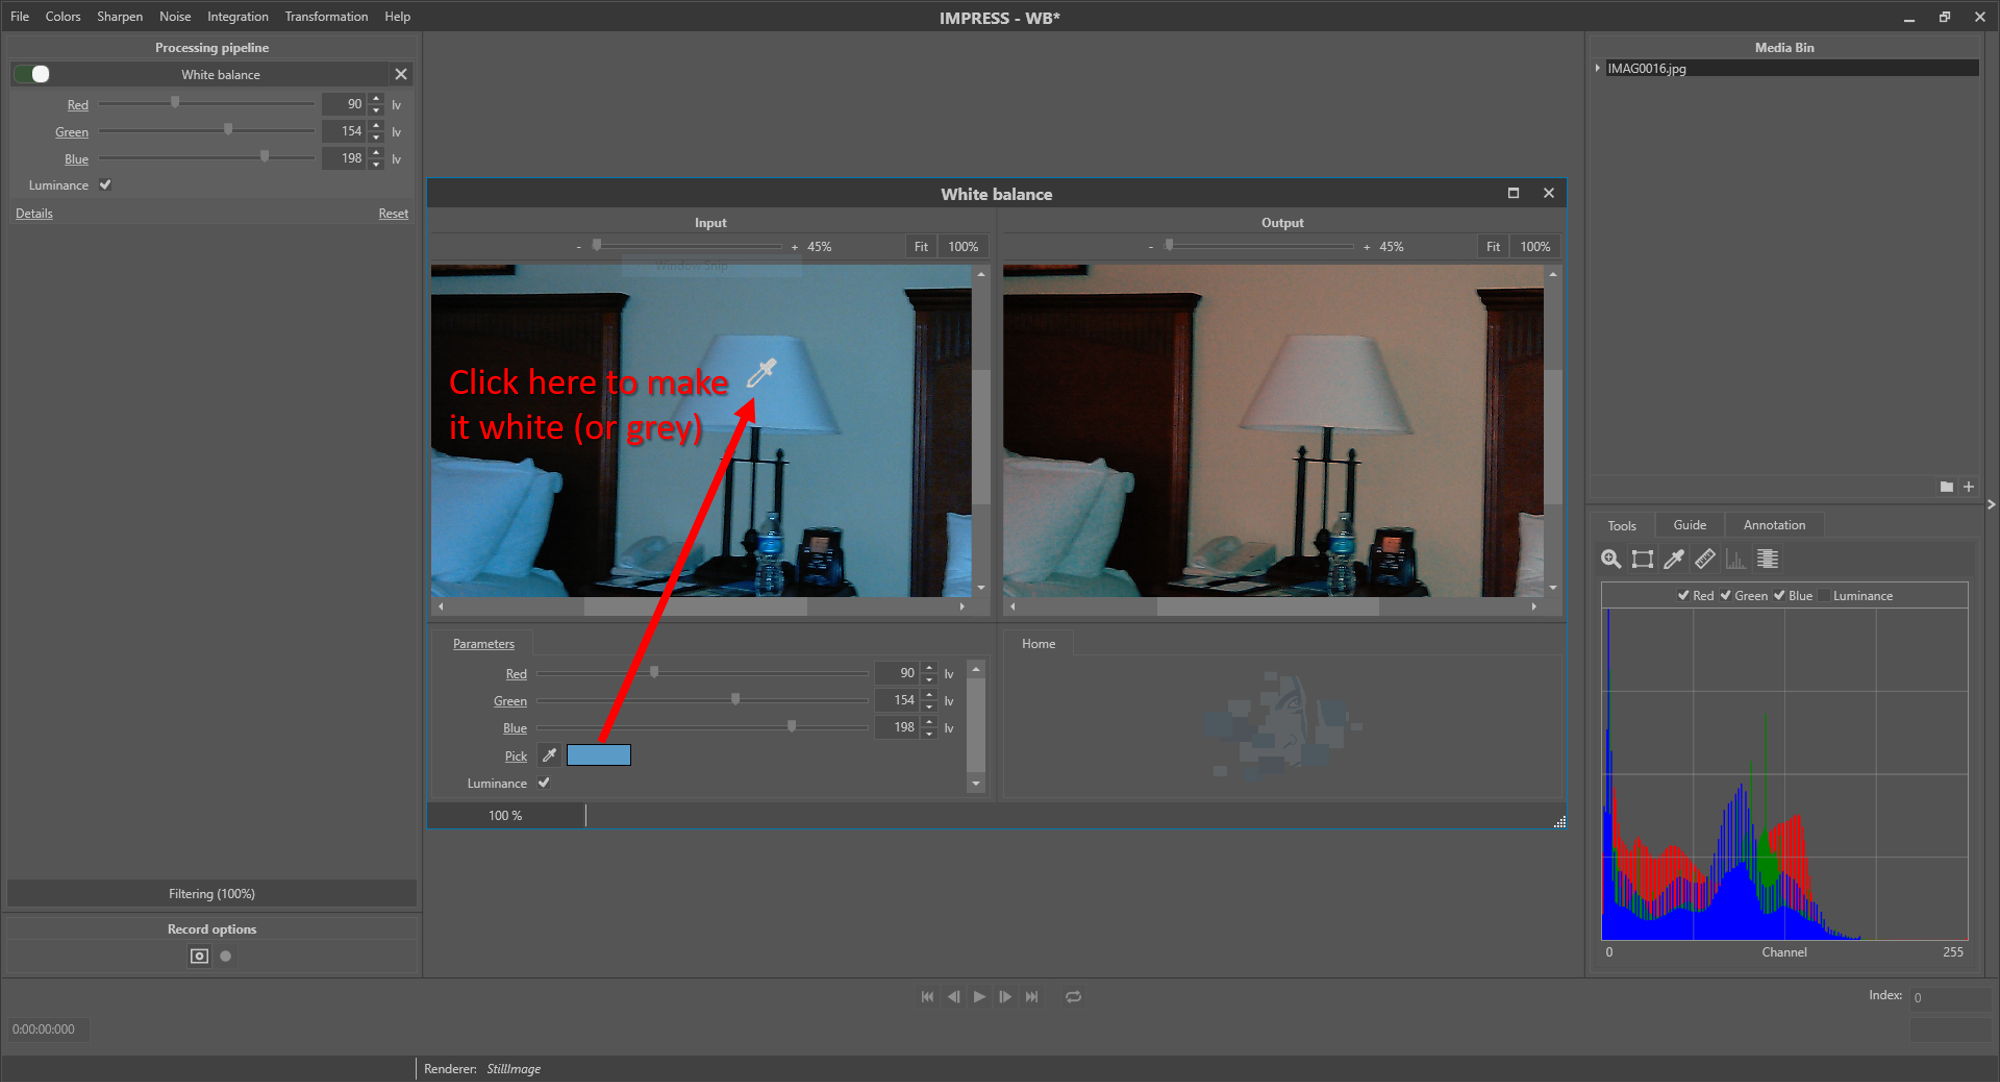
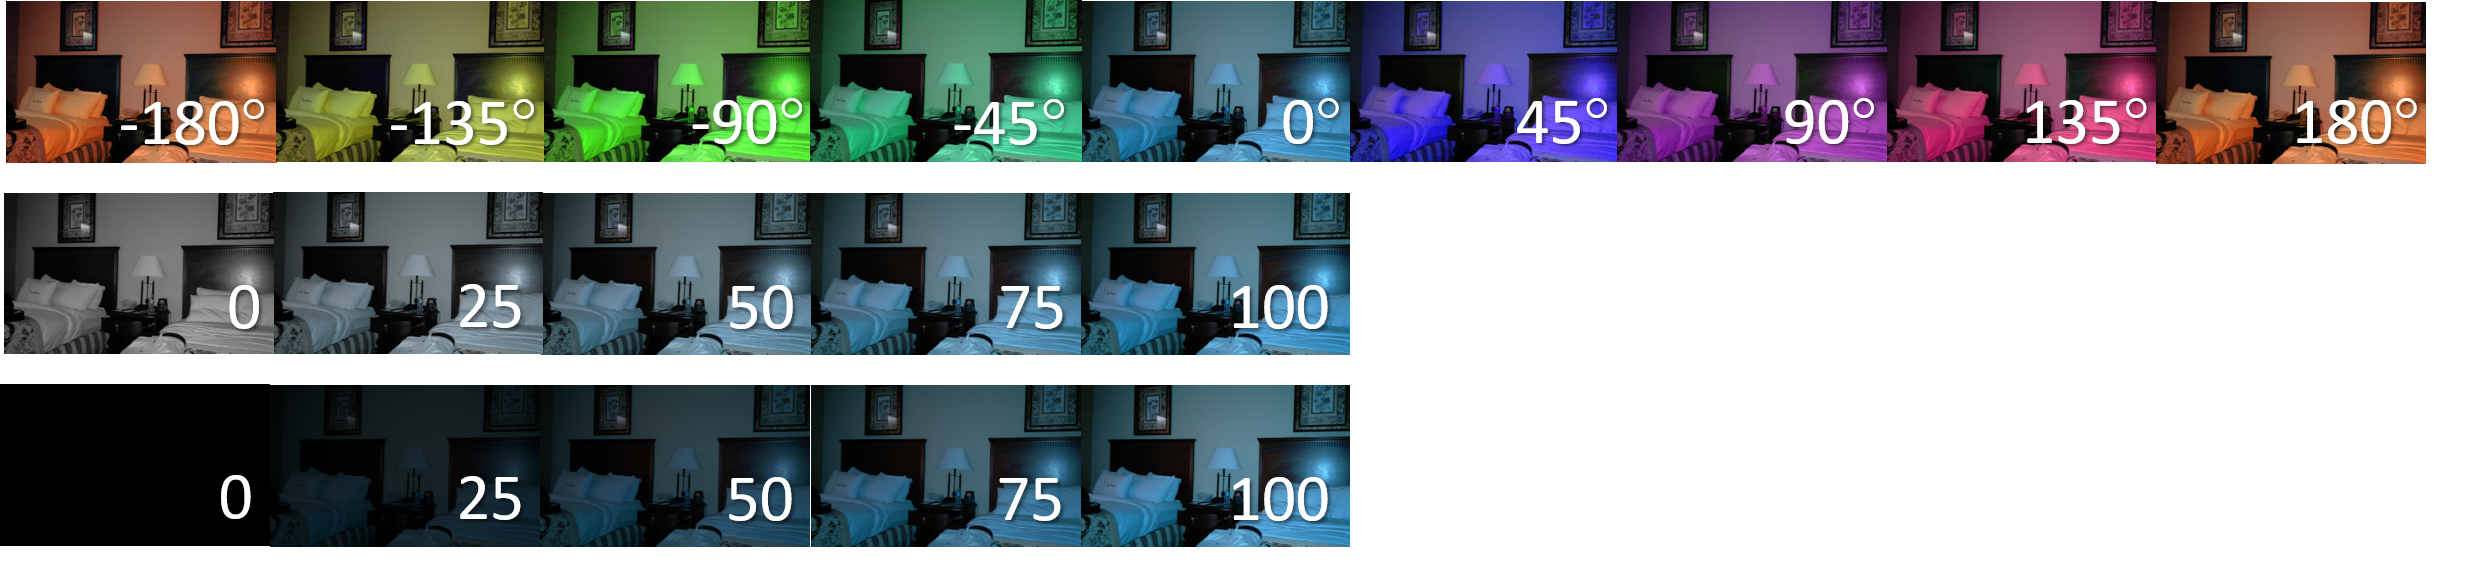
The parameter ‘Luminance’ is used to preserve the luminance level of the image. If the parameter is not checked, the selected colour is transformed to white, increasing the luminance level of the image and possibly causing signal clipping. If the parameter is checked, the selected colour is transformed to grey, with a luminance level equal to the original colour. See Table 1 for an example. Figure 5 shows the result of the white balance filter.


Conclusion
Absence of white balance is a common problem which can significantly reduce the reliability of interpretation surrounding colours of evidence imagery, and correcting the white (or grey) point values or hue values is a simple fix. White balance is only applicable if a reference object of white or grey colour is present in the image, and hue correction can be applied if one or more objects of known colour are present in the image. In light of the technical implementation of colour versus luminance digitisation, considerations for such must be made when interpreting the colours of features within CCTV captures.
References
[1] SWGDE, “Recommendations and Guidelines for Using Video Security Systems,” Version 1, Sep. 2015.
[2] Yung-Cheng Liu, Wen-Hsin Chan, and Ye-Quang Chen, “Automatic white balance for digital still camera,” IEEE Trans. Consum. Electron., vol. 41, no. 3, pp. 460–466, Aug. 1995, doi: 10.1109/30.468045.
[3] International Commission of Illumination. http://cie.co.at/
[4] Charles Poynton, Digital Video and HDTV: Algorithms and Interfaces. Elsevier, 2007.
[5] M. Afifi and M. S. Brown, “Deep White-Balance Editing,” ArXiv200401354 Cs, Apr. 2020, Accessed: May 15, 2020. [Online]. Available: http://arxiv.org/abs/2004.0135....
[6] Sonka M. Hlavac V. Boyle R. Image Processing, Analysis and Machine Vision, p25 Brooks/Cole Publishing Company, 1999.
[7] R. Szeliski, Computer Vision, Algorithms and Applications, p63 Springer, 2011.