News
Super Resolution
15 December 2023
Article by James Zjalic (Verden Forensics) and Henk-Jan Lamfers (Foclar)
Problem
Events captured within video imagery utilised as evidence in trials are often at a distance from the camera lens, and thus, the resolution of the region is low. Although the resolution can be increased via rescaling using methods discussed in a previous blog post [1], doing so can increase the visibility of the individual pixels within the said region, leading to a coarse representation of such. Once block edges become visible, the human visionary system will treat them as discrete parts of an image, rather than the continuous manner that they are perceived when not visible.
Cause
Although the resolution of CCTV systems has gradually improved over time, it is still extremely common for video recordings to serve as exhibits that utilise low resolutions, either due to the use of an older system or the nonintentional conversion of a recording through a messaging application such as WhatsApp. Even in the best-case scenario, when the system used utilises a high resolution, the resolution of the region of interest within the imagery can be low due to the distance of such from the camera lens. When a low-resolution system is used to capture the imagery, the effects of distance are further compounded.
Solution
The best solution to the problem would be to travel back in time prior to the event of interest and ensure there is a high-resolution CCTV system close to the event with the lens pointing directly at it. As time travel isn’t yet possible, the only option we have is to work with the imagery that has been captured and use a method to increase the resolution of the region of interest. Techniques that fall under this descriptor are called ‘Super-Resolution’, and these methods can provide higher resolution images in which the previously discussed blocking artefacts associated with nearest neighbour rescaling are less visible.
There are two distinct groups of super-resolution. The first is hallucination-based and can be referred to under different guises (e.g. single image super-resolution). This method employs a training step to learn the relationship between low-resolution and high-resolution captures of the same environment, followed by the application of this relationship to new images to predict missing high-resolution information. Deep learning is perfectly suited for the implementation of this technique, and the results can be good, but the method is not suitable for forensics due to the data prediction element, which can lead to changes to the data within an image that an examiner may not be aware of, and thus lead to inaccurate conclusions.
The second method is reconstruction-based or multiple image techniques. These use multiple frames of the same scene and utilise the differences between them to reconstruct detail. These differences can be geometric, such as differences in the position and distance of a camera lens to the object of interest, or photometric, such as differences in the lighting conditions [2].
The general approach consists of three steps [3], as follows.
First, Registration. This process determines the relationship between frames through alignment and the mapping of corresponding points to a single image. Once complete, all will share the same coordinate system.
Second, Interpolation. The images are interpolated through resampling to transform the set of coordinate locations into a high-resolution grid.
Third, de-blurring. High-frequency information that has been reduced during the previous stage is restored [4].
Implementations
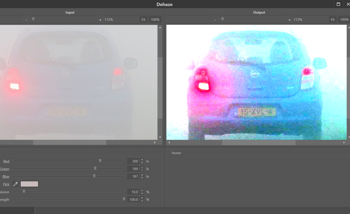
The super-resolution filter [5] in Impress can be used on sequences with a moving object of interest (for example, a number plate). The plate should not be stationary, but if the object is moving too fast, the region would likely be subject to motion blur, which complicates matters. In Figure 1 the low resolution frames of a short video clip are shown. Below the sequence, the relative displacements of the LR-frames are shown. Only the sub-pixel displacements are plotted (range [-0.5,0.5] for both horizontal and vertical displacements). To the right of the plot, the high resolution SR image is displayed.

Figure 1: Sequence of low-resolution plates with sub-pixel shifts [-0.5,0.5] and resulting super-resolution image.
The (sub-)pixel displacements of the LR-frames are calculated in the registration step of the super-resolution filter. To start this phase, the operator has to select the first relevant frame of the short sequence the filter is applied to. This can be done by selecting a time range using the in and out-point using the timeline control. After setting these points, the user must navigate back to the in-point and add the super resolution filter to the pipeline (see Figure 2) and select a region of interest (ROI) containing the object of interest. The filter parameters can then be adjusted and the video replayed to the out-point (or end of the video). The scale parameter determines the super-resolution scale factor and is maximised to 3.0 (300%). A simple rule of thumb is that when fewer images are available, a smaller scale factor is used, and when more images are available, a larger scale factor is best. For super-resolution to be effective, a minimum of four images should be used.
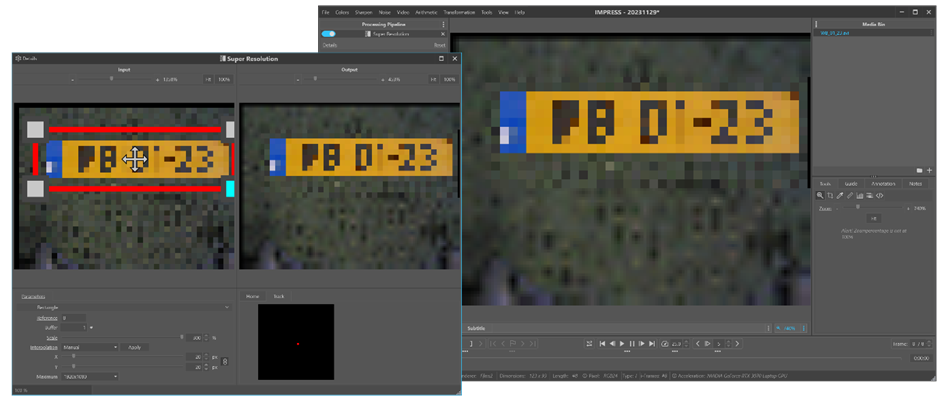
Figure 2: Loading the sequence in Impress and adjusting the parameters of the super resolution filter on the first frame.
After the registration of the relative sub-pixel displacements of the LR-frames, these frames are combined (frame fusion) into a high-resolution image. The fusion algorithm consists of two stages: weighted median interpolation followed by iterative weighted linear-interpolation using the result of the first stage as an input (first estimate). The LR-frames of pixel dimensions (W,H) are fused into one high-resolution image that has pixel dimensions: (S x W, S x H). The fusion step is only applied to the pixels in the original region of interest. The area of the SR-image outside the ROI are calculated by applying replicated scaling with scale factor S.
The processing can be accelerated by choosing the value manual for the interpolation parameter. In this case, only the median interpolation (stage 1) is used for the fusion step (see Figure 3). When reaching the end of the video (or out-point) by pressing the ‘Apply’ button, the second stage (iterative weighted linear-interpolation) is calculated for the total collection of all frames in the selected time frame (see Figure 4).

Figure 3: Weighted Median interpolation super resolution result.

Figure 4: Iterative Weighted interpolation result.
The last (optional) step of the super-resolution process is the de-blur filtering. Due to errors in the sub-pixel displacements from the registration process the SR-image is blurred. The variations in the registration errors can be approximated by a Gaussian distribution, and the blur can be reduced by applying the general de-blur filter [6-7] on the SR-image. Although the plate was already clearly readable in Figure 4, one can observe the increase of sharpness in the de-blurred image of Figure 5. In less favourable cases, the de-blur step of the process can bring critical improvements to the end result.
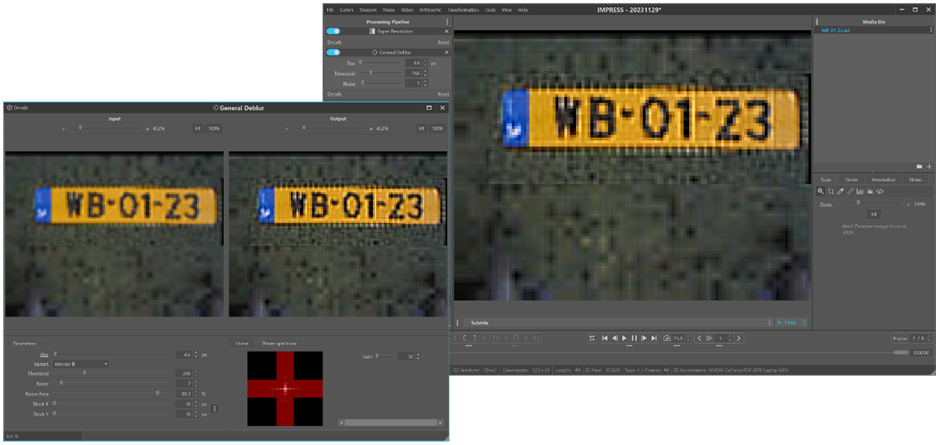
Figure 5: Post-processing with a general deblur filter.
The whole process can be repeated with the same or other parameter values by navigating back to the in-point. The filter result is cleared and recalculated as the sequence is played again until the end (out-point). Only by taking a snapshot is the SR-image (and/or de-blur image) saved to an image file.
Conclusion
Super-resolution is a technique that may assist when the resolution of a region of interest results in a coarse representation of such when rescaling using the nearest neighbour algorithm. However, considerations should be made as to whether it is suitable based on the method employed and the end user of the enhanced imagery. In order to make this judgement, an understanding of the method, including the interpolation algorithm, is essential to ensure that the end result does not add information to the image that is not present in the original version.
References
[1] Foclar and Verden Forensics, “Re-Scaling.” Accessed: Nov. 22, 2023. [Online]. Available: https://foclar.com/news/re-scaling
[2] J. Satiro, K. Nasrollahi, P. L. Correia, and T. B. Moeslund, “Super-resolution of facial images in forensics scenarios,” in IEEE 5th International Conference on Image Processing Theory, Tools and Applications, 2015.
[3] A. N. A. Rahim, S. N. Yaakob, R. Ngadiran, and M. W. Nasruddin, “An analysis of interpolation methods for super resolution images,” IEEE Stud. Conf. Res. Dev., 2015.
[4] S. Villena, “Image super-resolution for outdoor digital forensics. Usability and legal aspects,” Comput. Ind., 2018.
[5] R. Szeliski (2011) Computer Vision, Algorithms and Applications, p436 Springer.
[6] Sonka M. Hlavac V. Boyle R. (2013) Image Processing, Analysis and Machine Vision, p164 Brooks/Cole Publishing Company.
[7] Alan C. Bovik (2010) Handbook of Image and Video Processing, p173 Academic Press.