News
Brightness adjustments
02 July 2020
Article by James Zjalic (Verden Forensics) and Foclar
Problem
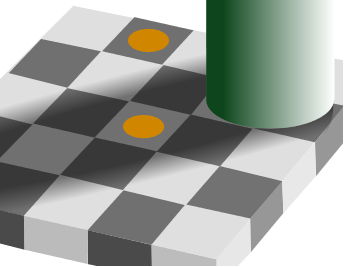
Although the human perception of brightness is based on comparisons and expectations of the world, it is both non-linear and subjective. The rendering of features and presence of artefacts caused by imagery which is too bright or too dark, however, can be visually demonstrated, and as such, is not subjective. When the level of brightness pertaining to imagery is not optimised, the result is often poor visibility of features due to reduced contrast, something which can potentially lead to misinterpretation of events or features. It has been shown that the human visual system can discern approximately 26 levels of brightness in a scene at one time [1], with changes only noticeable when they are between 2 and 3 percent lighter or darker than that which is being compared [2]. The perception of colour is also affected by the brightness of a scene, as shown in optical illusions (Figures 1 and 2). It can also be distracting for a viewer (or a jury in the case of forensics) if the imagery presented does not perceptually align their expectations of the real world.
Cause
Issues relating to brightness are often found within forensic imagery prior to any processing being applied due to the uncontrolled nature of the captures. When it is considered that the same static CCTV cameras are often utilised twenty-four hours a day, they are subjected to a range of lighting conditions, from pitch black (in the event of no artificial lighting at night-time) through to bright conditions on sunny days. It is, therefore, the job of the forensic imagery examiner to make the necessary adjustments to the brightness of video recordings and photos to ensure the lighting is optimised, potentially improving the visibility of features.
With that being said, it is also the forensic imagery examiners’ role to ensure that any adjustments made consider the potential impact of such, and do not degrade regions of interest within the imagery. For instance, in a low lit scene with street lighting, it is likely that increasing the brightness will improve the regions which are poorly lit, but it will also cause the brighter areas (such as those surrounding the light bulb) to increase proportionally, possibly resulting in clipping and thus overexposure. Although this is not ideal, providing the region of interest goes unaffected it is of little consequence. It does, however, become an issue if a high-intensity light source is within the region of interest. For instance, take a night-time capture of a subject holding a mobile phone in which the screen is lit. Increasing the brightness of this region will likely result in the pixels surrounding the bright screen becoming lighter and potentially clipping, causing a loss of valuable feature information in the process.

Theory
When a scene is captured, the camera sensor converts intensities of red, green and blue to numbers ranging from 0 – 255 [3]. These values are a combination of the light, the absorption and reflectivity of objects, as well as the camera sensor. Colour is a combination of hue and intensity, where hue is the differentiation between colours (e.g. orange, green) and intensity can be thought of as the brightness or darkness of an image based on the pixel value (0 – 255 for an 8-bit image). Although colours channels have intensity values, the intensity value itself can be considered to be colourless, and thus dependent on the specific channel. A uniform change to the pixel intensity value will not change the relationship between the intensity values of the channels, and will not, therefore, change the hue. The result will be a perceived change to the brightness of the image [4].
The process of brightness adjustment is a point operation in which pixel values are replaced with new values obtained from the old ones through the mapping of values between the input and output [5]. Consider that brightness is level (l) and is the minimum value of the output. Gain is (k), and controls the range. The brightness of the new image is represented by (N) and the brightness of the old image by (O). If gain is equal to or less than unity, the range increases.
NX,Y = k x OX,Y + l
Solution
Brightness adjustments should be performed at the same time as contrast adjustments, and after any de-blurring operations to ensure colours are accurately represented and not convolved throughout the image. The adjustments should also occur before any sharpening to ensure informed decisions are made in relation to such, as it may be that changes to brightness resolves issues which would usually be addressed by sharpening.
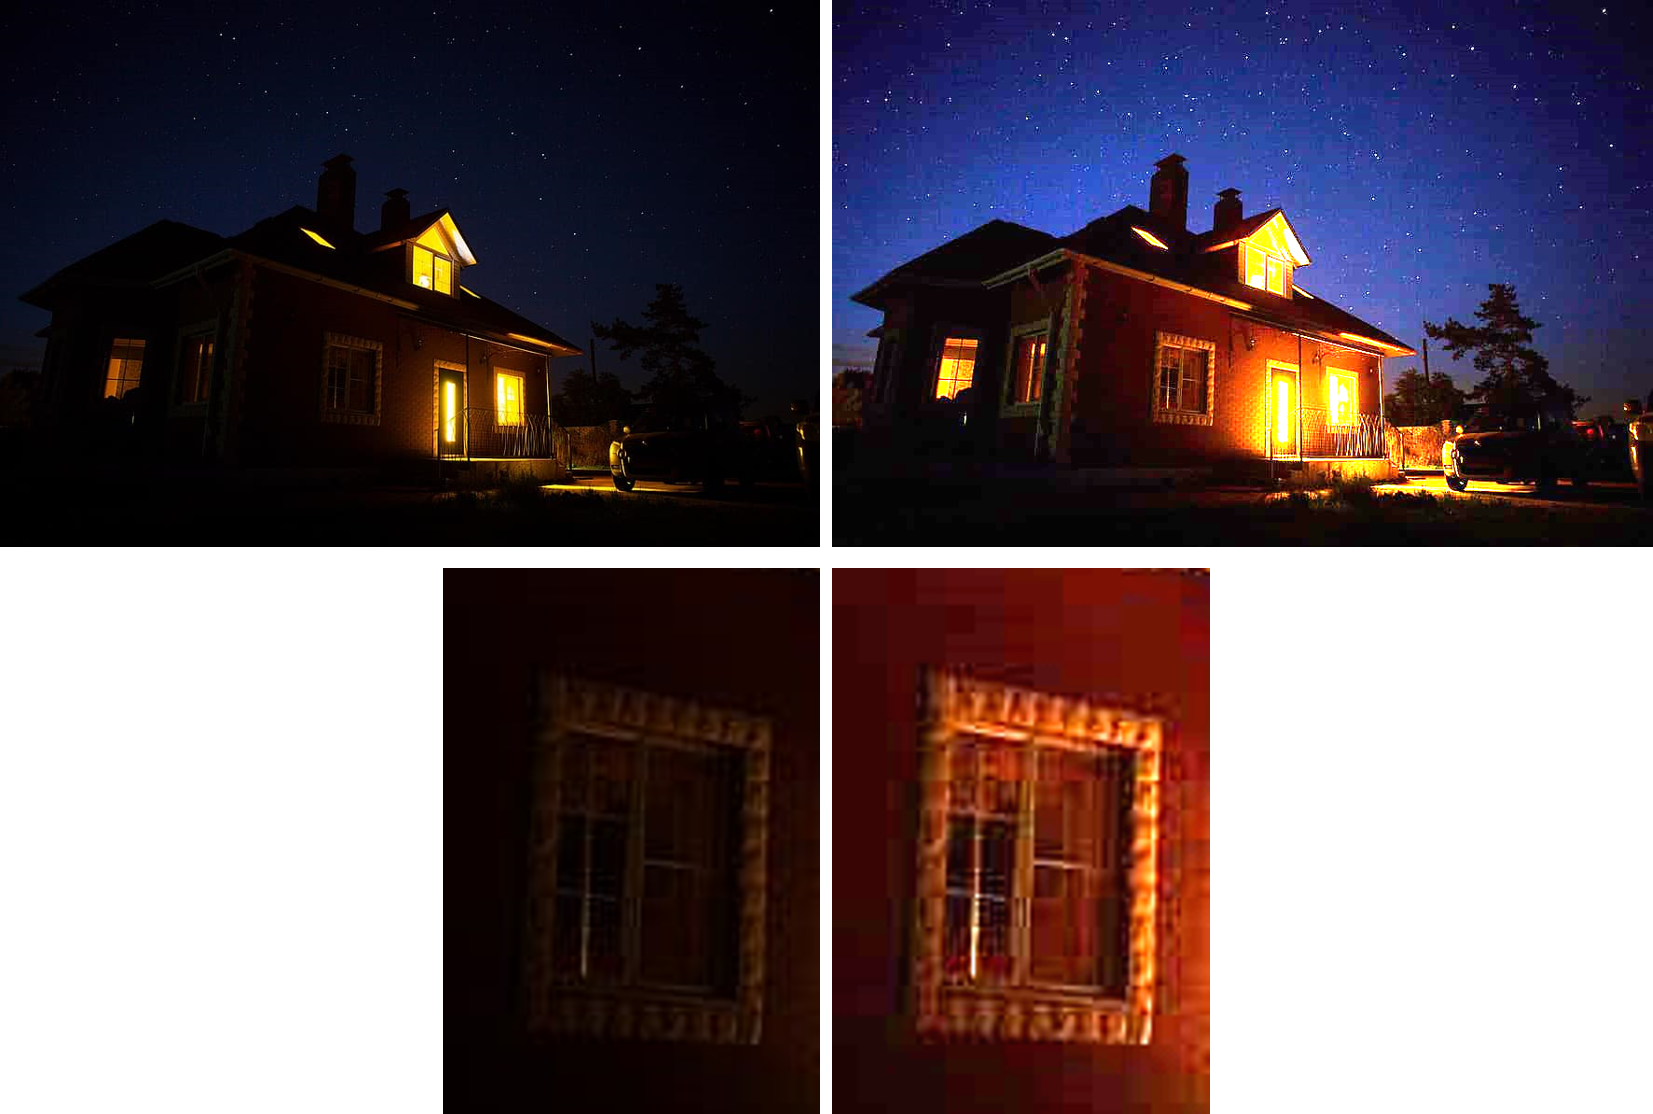
The application of brightness adjustments to digital imagery should be performed in three stages. Firstly, a decision should be made as to whether to crop the imagery to the region of interest, and thus limit potential artefacts caused by bright artificial lighting. Regions of intense brightness are also very dominant in perception, which can distract from the object/region of interest (Figure 3).
Secondly, in order to make informed decisions relating to the brightness, a histogram should be reviewed so the distribution of intensity values can be obtained and an informed, more objective decision made as to the processing required.
Once this has been performed, brightness adjustments should be applied, and A/B comparisons against the original imagery conducted to ensure that a) the imagery has improved and b) no artefacts have been introduced. With regards to the latter, a distinction should be made between the introduction of artefacts, and original artefacts which were within the imagery but not as clear. An example of an introduced artefact would be the processing causing overexposure, where the pixel intensity values of a region have increased to the point that they are clipping, so neighbouring pixels now have matching intensity values and thus contrast and feature visibility is lost. Original artefacts which were previously within the imagery may be those such as blockiness. As spatial encoding compresses regions such as large areas of darkness using similar values to aid in smaller file sizes (as these are the regions the human vision system is less likely to perceive as being different) when the intensity values are increased, the degree of blockiness becomes clear. As this was not introduced by the process, it should not be considered to be an issue as no data has been lost.
Implementations
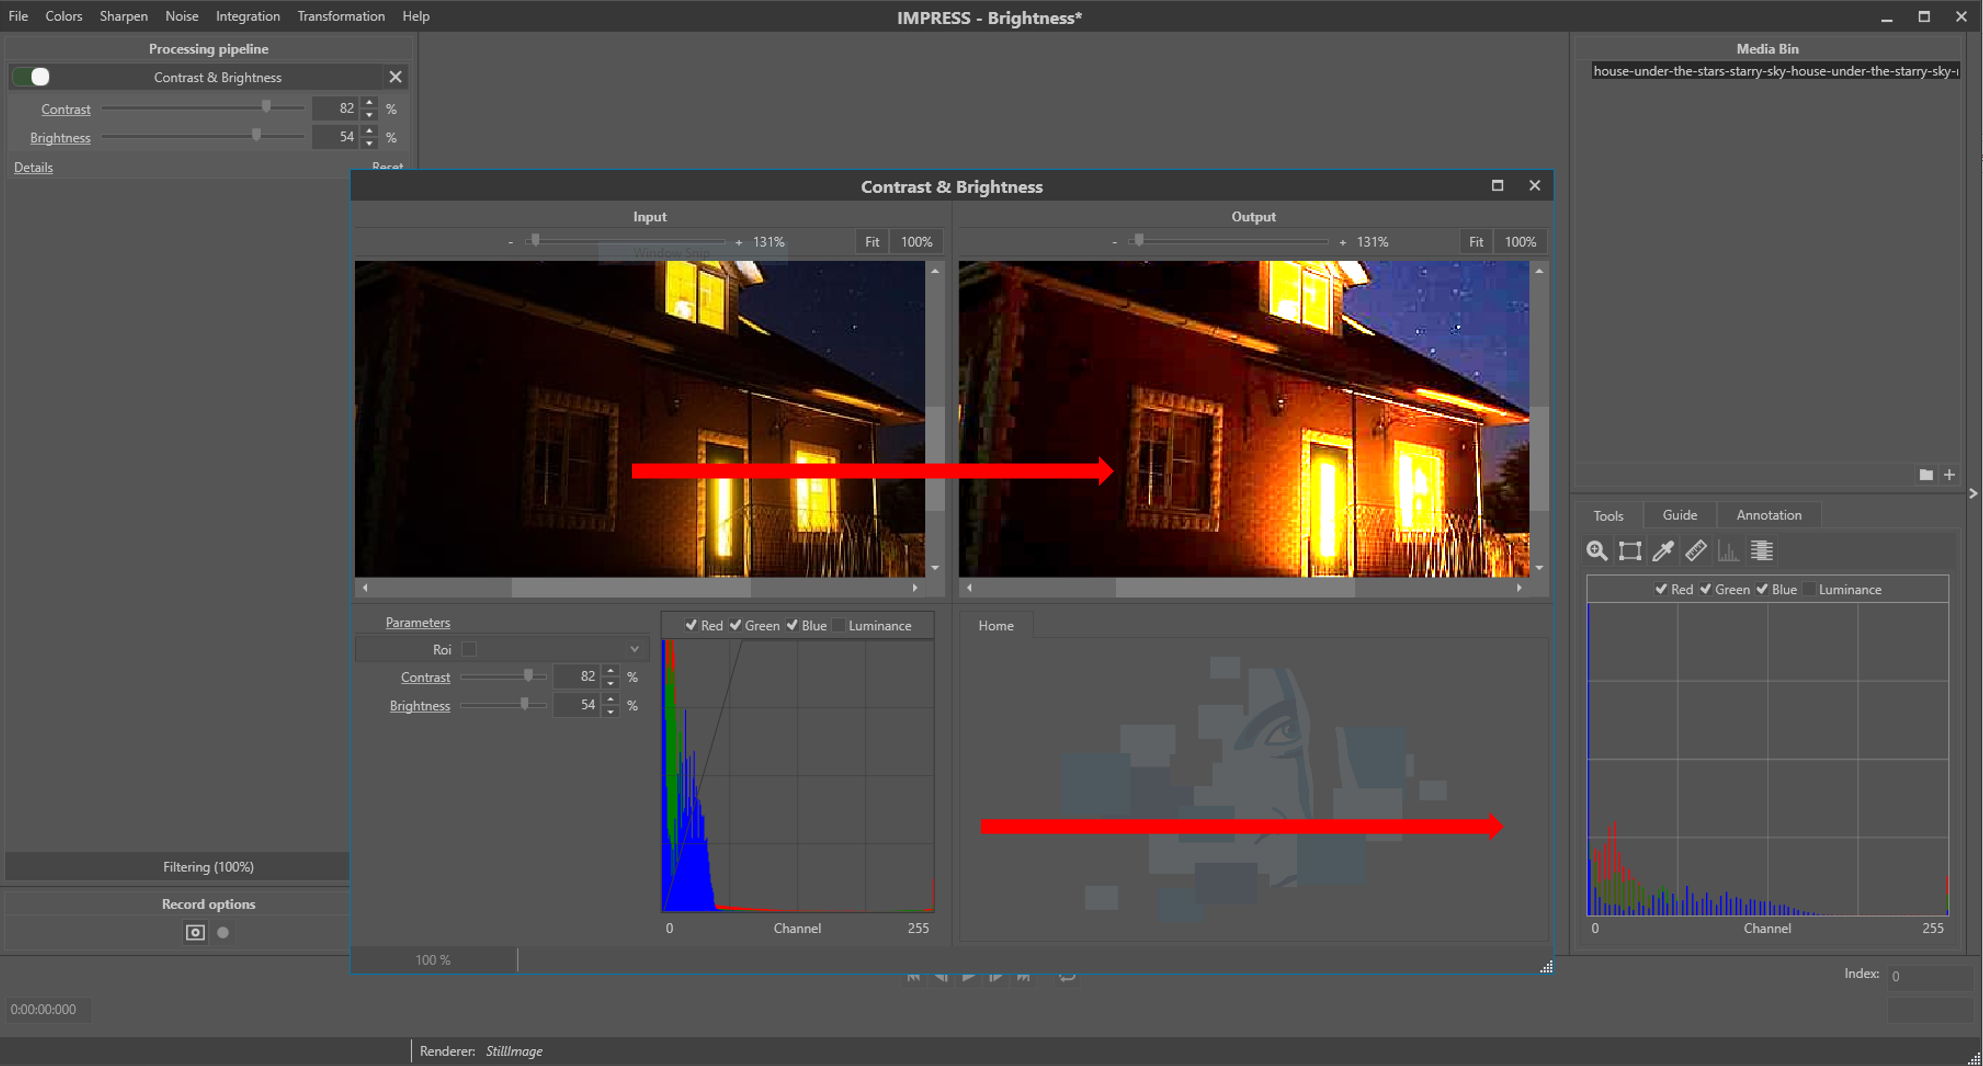
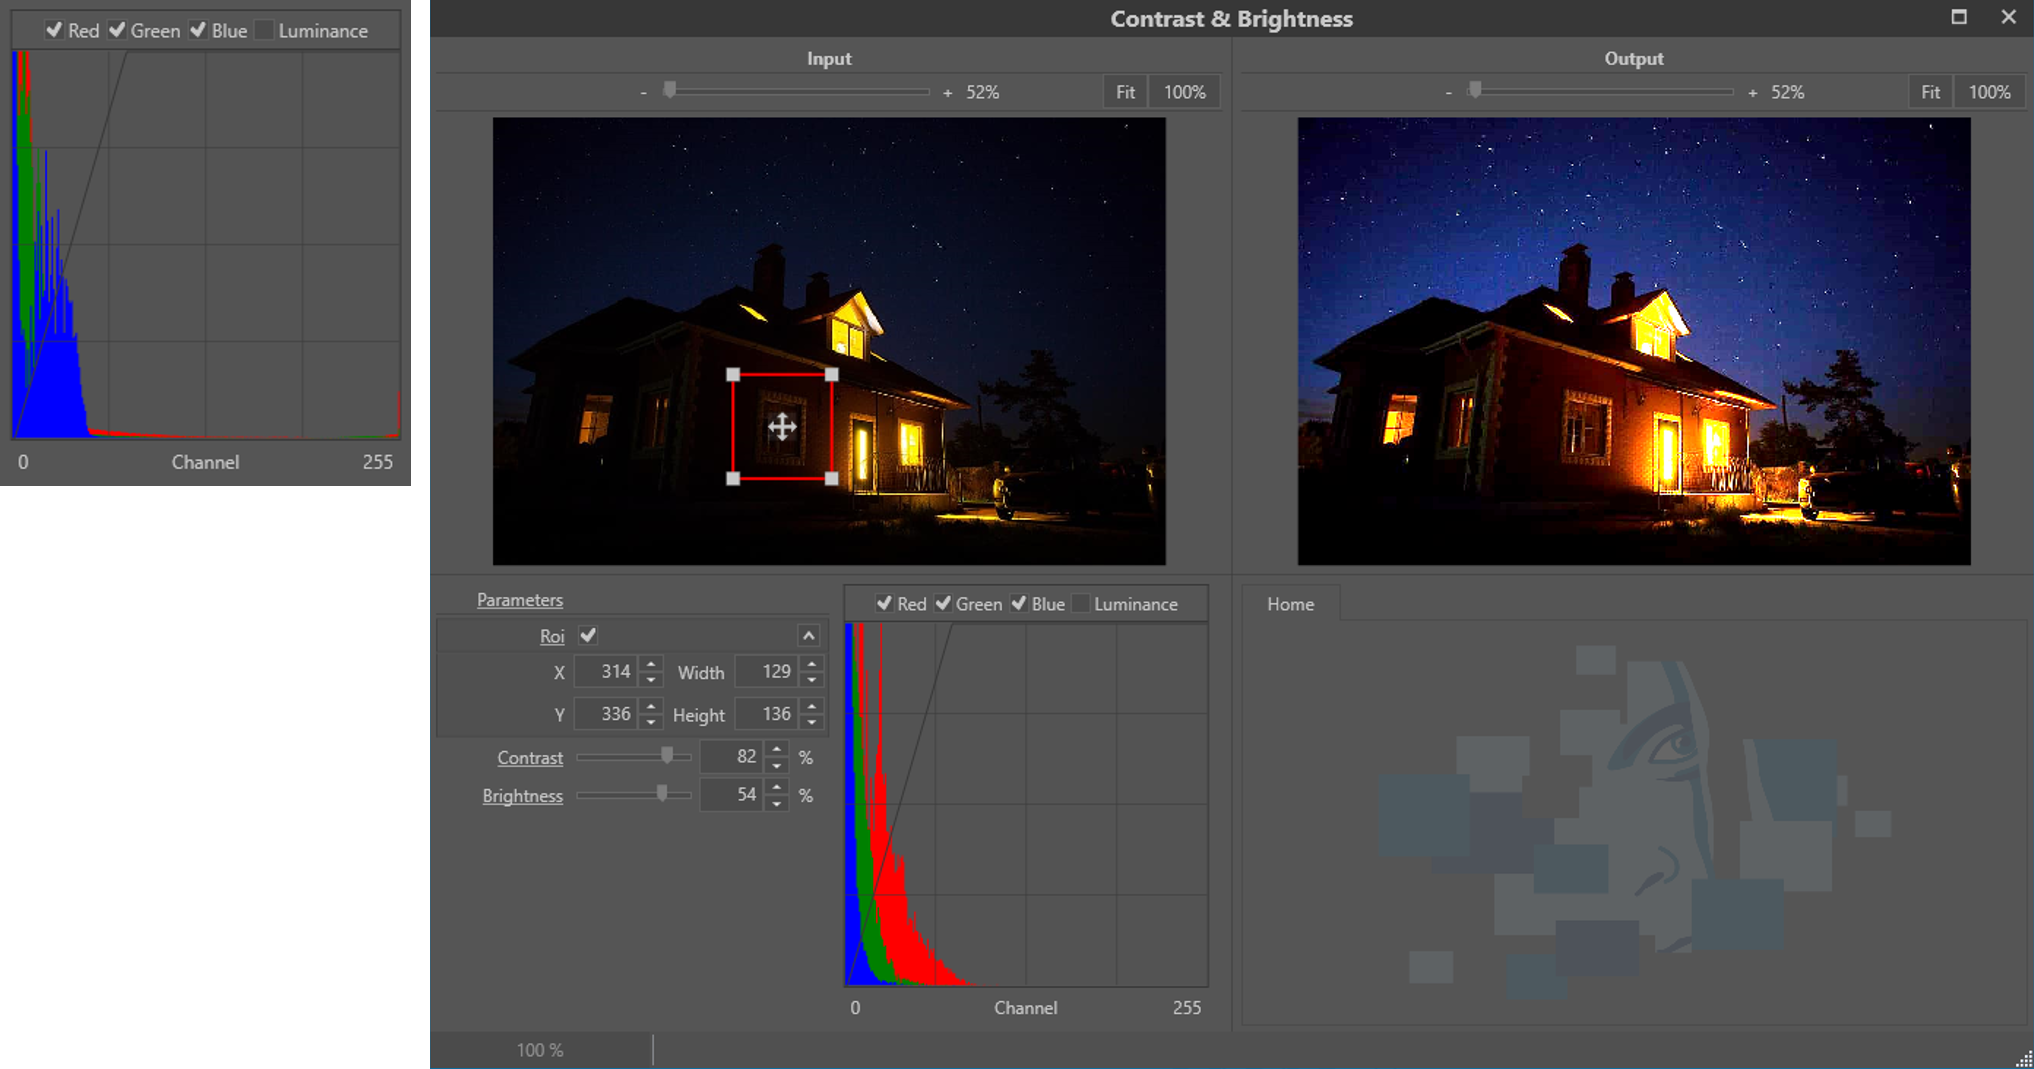
In Impress the brightness adjustment is available [6 - 8] in combination with the contrast adjustment: menu Colors -> Contrast -> Contrast & Brightness (Figure 4). In the detail window the filter offers an additional parameter Region of interest (Roi). If the parameter is switched ON, the input histogram is shown of the selected region of interest (see Figure 5). If the parameter is switched OFF, the input histogram of the total image is shown. In the tools area on the main window (bottom right) the output histogram is shown. Comparing input and output histogram is a powerful way to optimize contrast and brightness for images and video frames.
Conclusion
Adjustment of brightness levels in images is important to facilitate optimal interpretation of images and video frames, but it is vital that the introduction of artefacts and clipping is avoided to preserve as much information as possible. A powerful way to assess the imagery is to simultaneously utilise a histogram and visual analysis, before applying brightness level adjustments and then comparing the pre and post processed imagery using the same methods.
References
[1] C Grigoras and JM Smith, “Audio Enhancement and Authentication,” in Encyclopedia of Forensic Sciences, Second Edition., Elsevier Ltd, 2013, pp. 315–326.
[2] John C. Russ, Forensic Uses of Digital Imaging. CRC Press, 2001.
[3] John Watkinson, The Art of Digital Video, 4th Edition. Focal Press, 2008.
[4] Spencer Ledesma, “A Proposed Framework for image enhancement,” University of Colorado, Denver, 2015.
[5] Mark Nixon and Alberto Aguardo, Feature Extraction & Image Processing. Newnes, 2002.
[6] Sonka M. Hlavac V. Boyle R. (1999) Image Processing, Analysis and Machine Vision, p10, 33 Brooks/Cole Publishing Company.
[7] R. Szeliski (2011) Computer Vision, Algorithms and Applications, p91 Springer.
[8] Alan C. Bovik (2010) Handbook of Image and Video Processing, p27 Academic Press.